Wound Packing: The Skill That Stops Junctional Bleeding When a Tourniquet Can't

Most people learn two things about stopping bleeding: apply pressure and use a tourniquet. That's a good start. But there's a class of injuries where those tools don't work — and that's where the wound packing technique comes in.
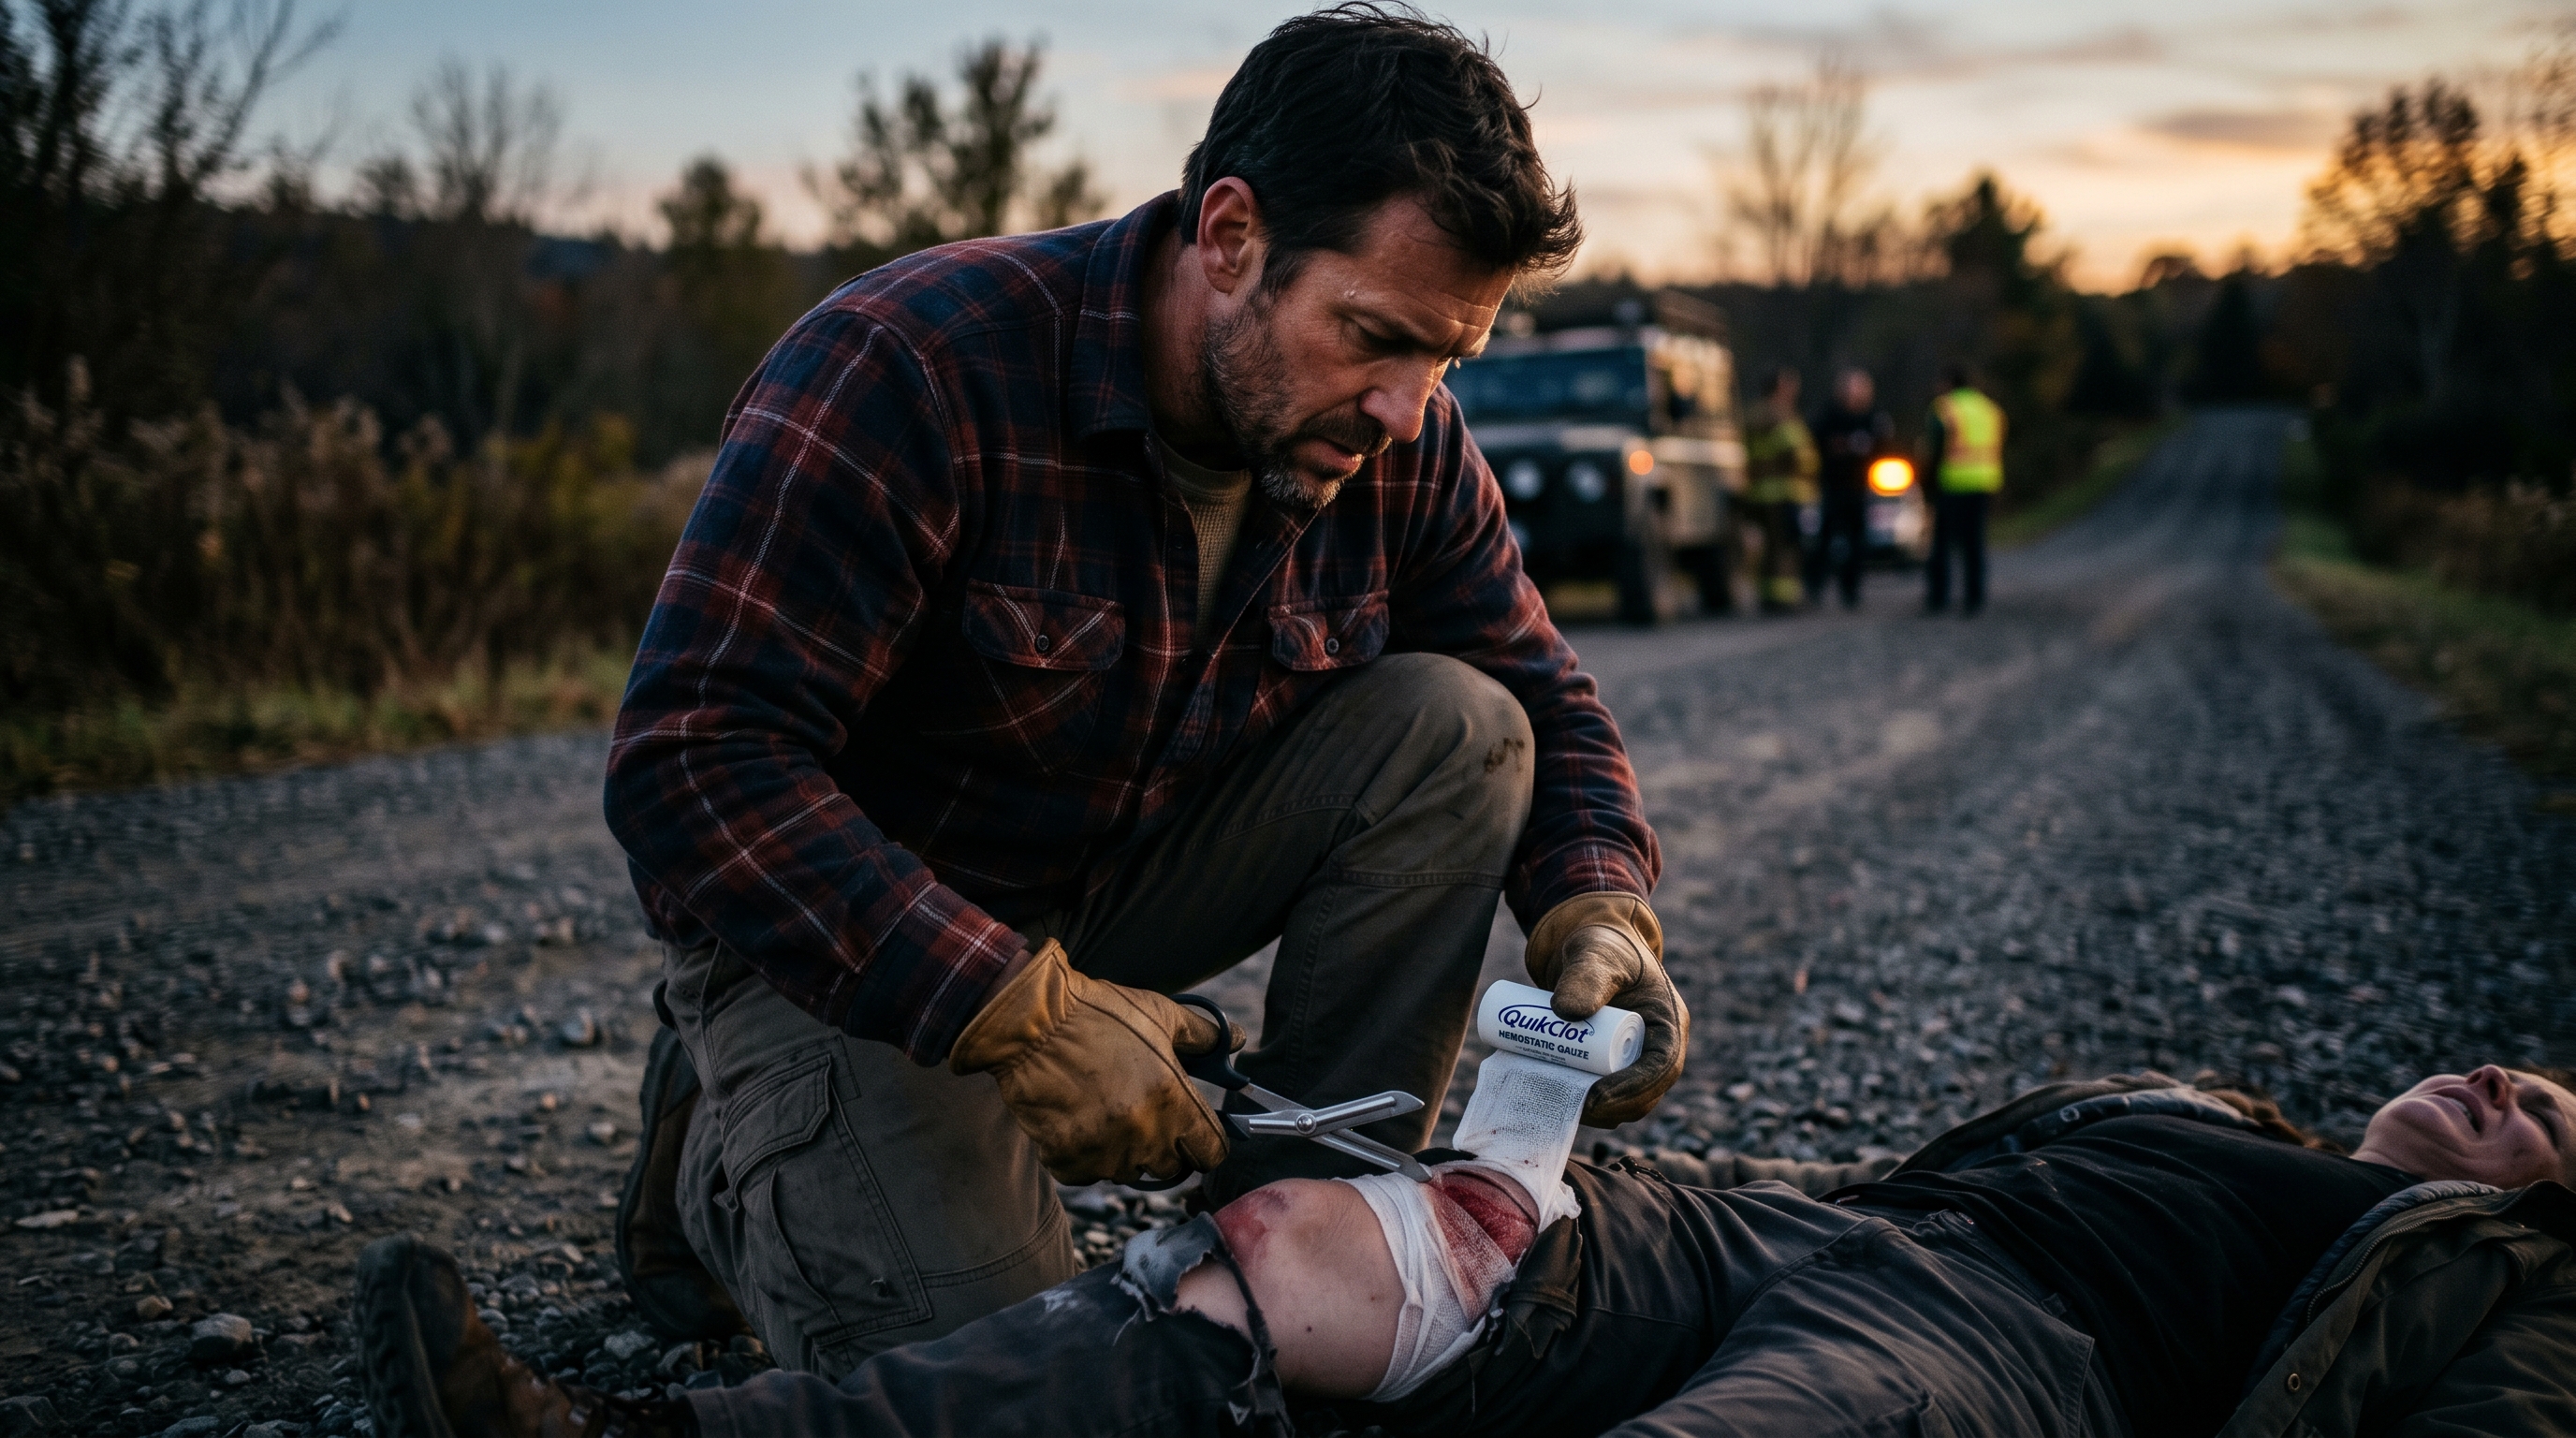
Junctional injuries — wounds in the areas where your limbs meet your torso — kill fast. The femoral artery in the groin, the axillary artery in the armpit, the carotid in the neck. You can't get a tourniquet around those areas. Direct pressure with a hand isn't enough to stop arterial bleeding. What works is packing the wound with gauze and holding it.
Military trauma medicine taught us this. The technique that saved lives in Iraq and Afghanistan is now standard in civilian Stop the Bleed training. Every civilian who carries a trauma kit should know how to do it.

When to Use Wound Packing vs. a Tourniquet
This distinction matters. Use the wrong tool and you waste critical time.
Use a tourniquet when the wound is on an arm or leg, at least 2–3 inches above a joint, and you can get the tourniquet cinched above it. Tourniquets work by cutting off blood flow to everything below the band. That only works on limbs. Learn more in our guide to tourniquet use for civilians.
Use wound packing when:
- The wound is in the groin, armpit, or neck (junctional zones)
- The wound is deep — a stab wound, gunshot wound, or deep laceration — not a surface cut
- A tourniquet can't be placed high enough on the limb
- You've already applied a tourniquet and bleeding hasn't slowed — the wound may be too close to the junction
- The wound is in the torso or back where a tourniquet is impossible
Both skills belong in your toolkit. In a serious trauma, you may need to use both — tourniquet on the limb, packing on a secondary wound. Our broader guide to stopping severe bleeding covers when and how to layer these interventions.
What Wounds Respond to Packing
Not every wound gets packed. The technique works best on specific injury types:
Penetrating Wounds (Stab and Gunshot)
Knife wounds and gunshot wounds create deep cavities with an entry point. Packing fills that cavity and applies pressure at the bleeding source rather than just at the surface. This is the primary use case.
Deep Lacerations
A cut from glass, metal, or machinery that's deep enough to create a wound cavity rather than just a surface tear. If you can see the wound "opening up" and direct palm pressure isn't controlling it, packing is appropriate.
Junctional Injuries (The Most Critical)
These are the injuries where packing is irreplaceable. The groin (femoral vessels), armpit (axillary vessels), and neck (carotid and jugular) all have major blood vessels that can produce fatal hemorrhage within minutes. A tourniquet can't be applied. Packing is the intervention.
When Packing Is NOT Appropriate
Do not pack wounds in the chest cavity (sucking chest wounds need a chest seal, not gauze), abdominal wounds with organs exposed, or wounds where a tourniquet is clearly working and the limb bleeding is controlled. Impaled objects stay in — don't pack around them, pack against them if you must, but removing the object makes things worse.

Supplies You Need for Wound Packing
You can pack a wound with any clean cloth in an absolute emergency, but these are the right tools:
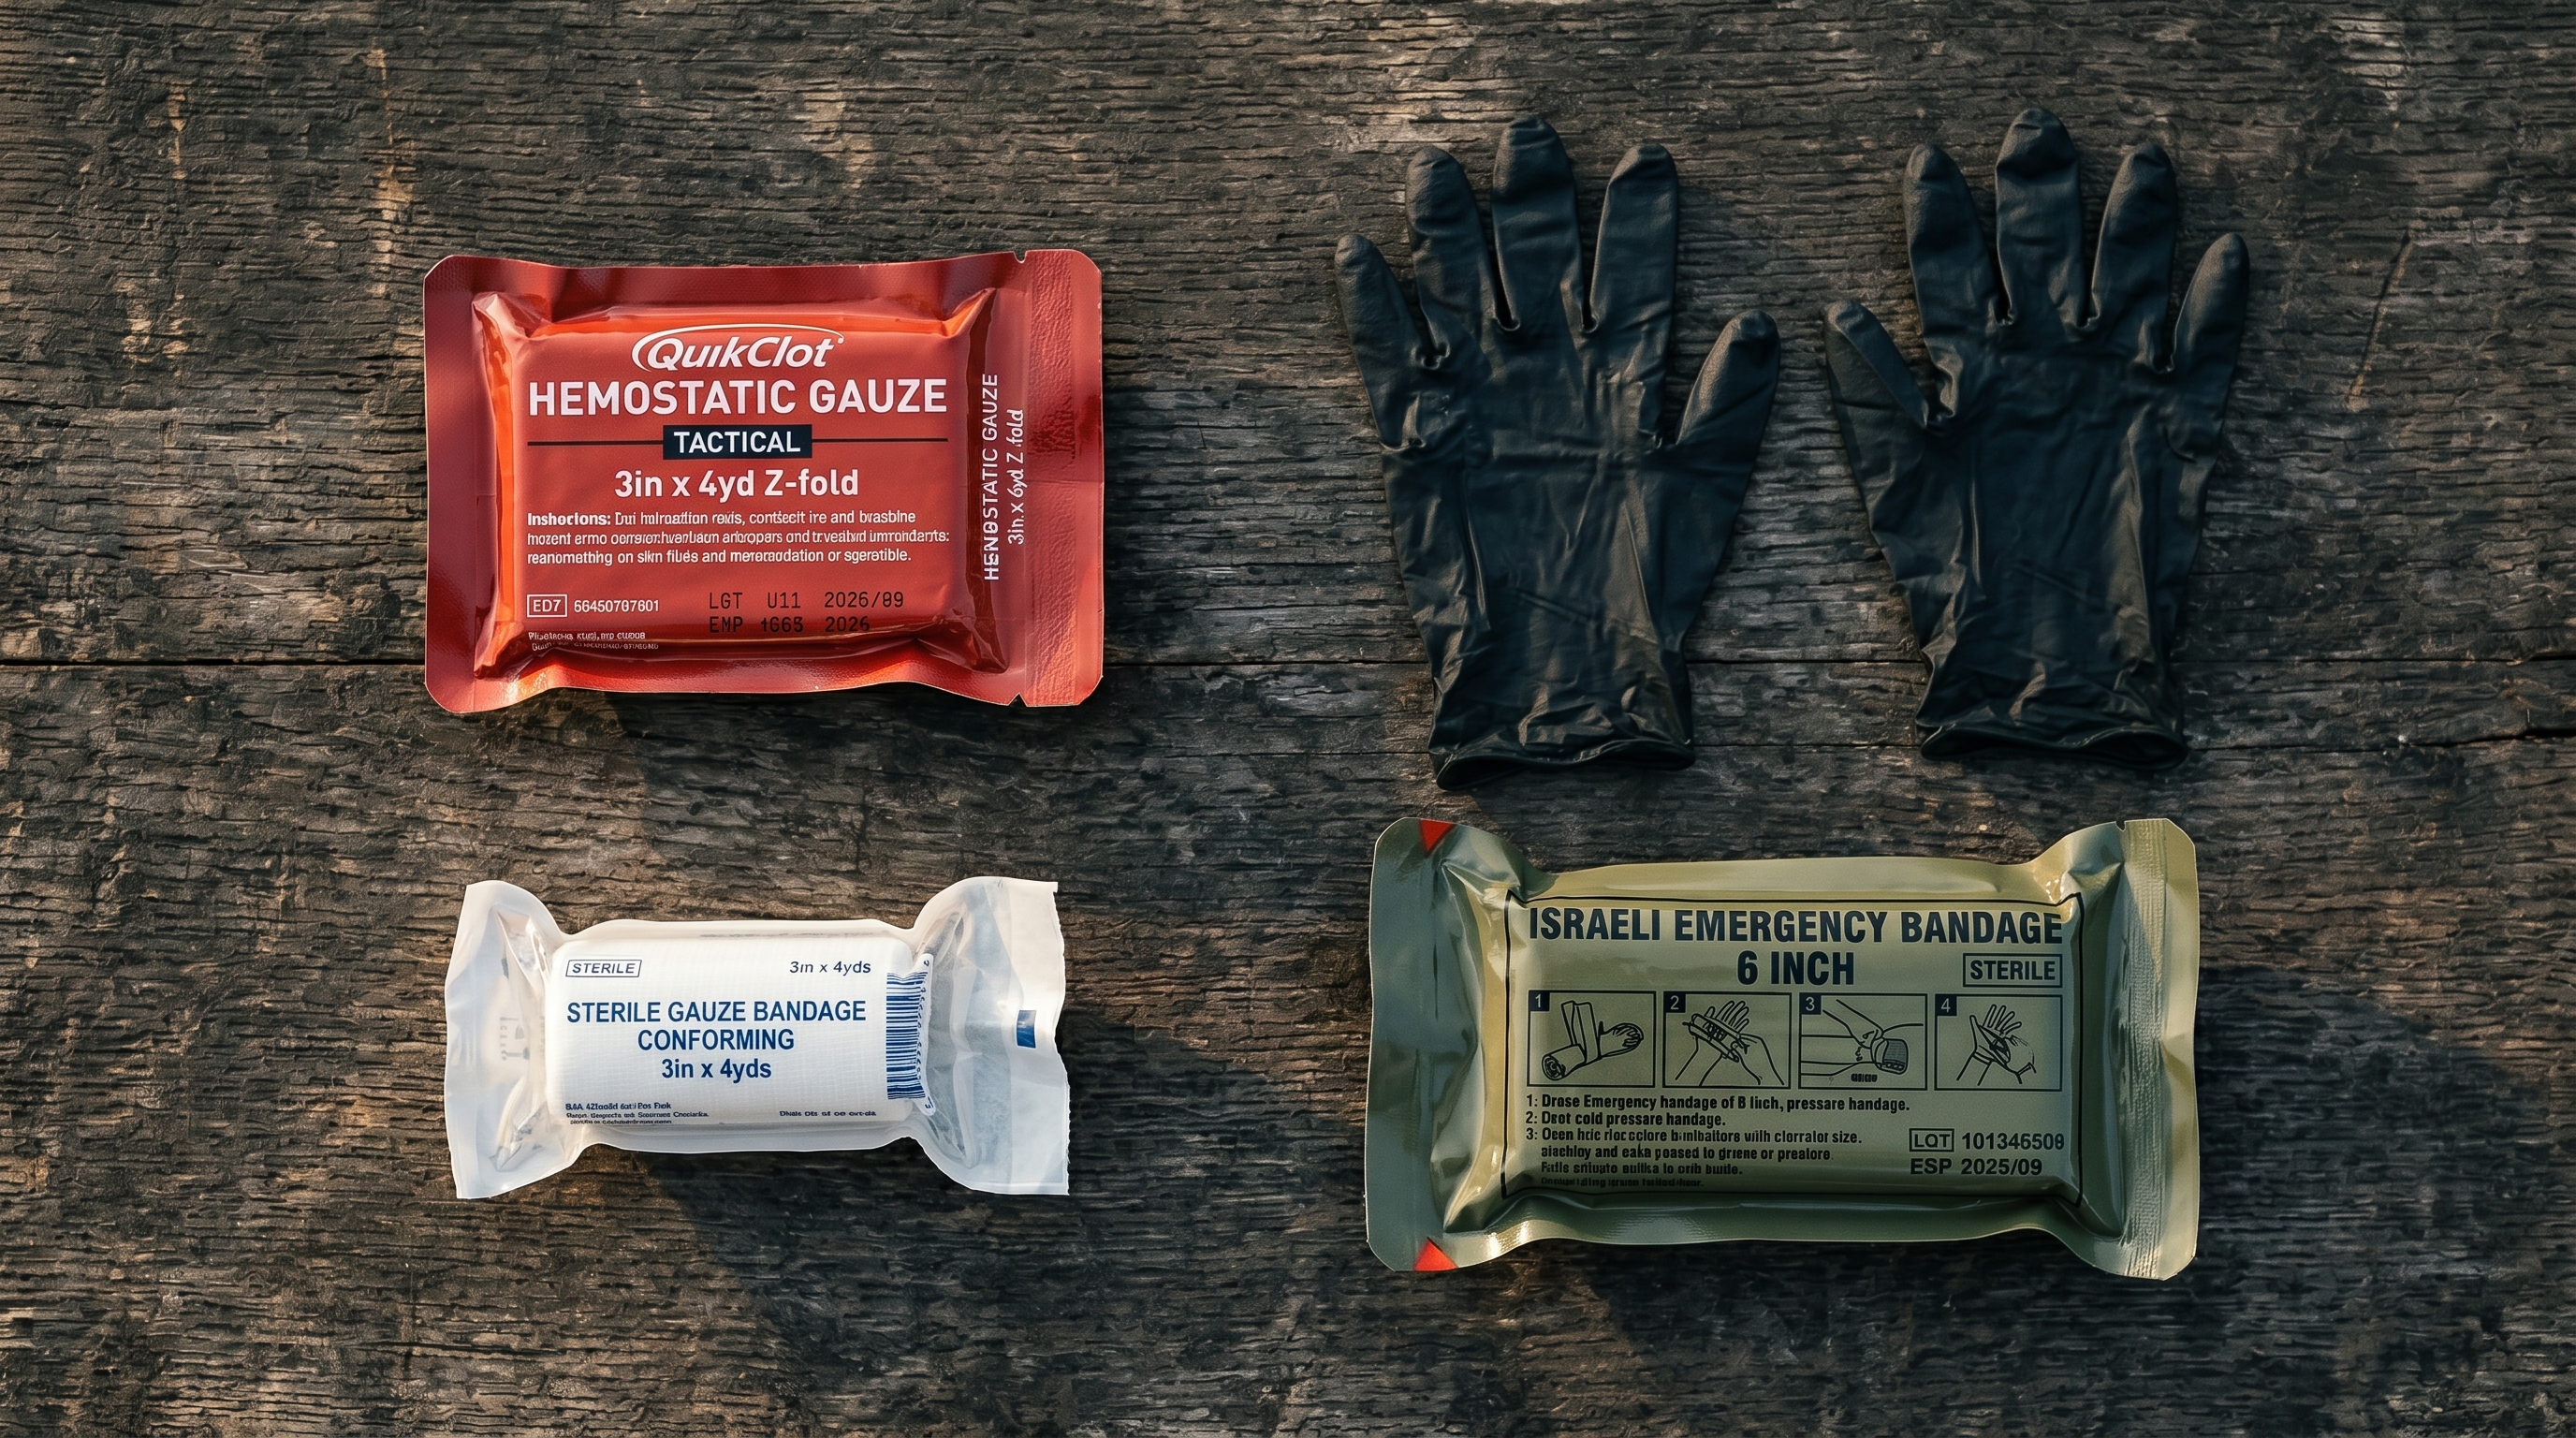
Hemostatic Gauze (Best Option)
QuikClot and Celox are the two main brands. These are gauzes impregnated with hemostatic agents — substances that accelerate clot formation. Military medics use this. It significantly improves outcomes on arterial bleeding. If you're building a trauma kit, this is what goes in it.
Plain Rolled Gauze (Works in a Pinch)
Standard rolled gauze — the kind in every first aid kit — works for wound packing when hemostatic gauze isn't available. It takes longer and requires more sustained pressure, but it's far better than nothing.
Nitrile Gloves
Protect yourself. Bloodborne pathogens are real. If you're responding to a stranger's injury, gloves are essential. Carry them in your kit.
Trauma Dressing or Pressure Bandage
Used to secure the packed gauze after you've finished packing. An Israeli bandage works well — it creates pressure over the packed wound without you holding it forever.
How to Pack a Wound: Step-by-Step
Work fast. For arterial bleeding, you may have two to four minutes before the situation becomes non-survivable. Don't rush at the cost of doing it wrong, but don't slow down either.
- Gloves on. If you have them. Don't delay for gloves if you don't — use the packaging or a plastic bag as a barrier, or go bare-handed. A blood transfusion is not worth dying for.
- Expose the wound. Cut away clothing. You need to see what you're working with. Don't pack through fabric.
- Find the source. Look into the wound. You're trying to identify where bleeding is heaviest — the point of origin. That's where the gauze needs to go first.
- Pack from the deepest point. Don't drop gauze on top of the wound. Push the leading edge of the gauze all the way to the bottom of the wound cavity, as deep as your finger can reach. Start there.
- Pack tightly, continuously. Feed gauze in as you pack — no air gaps. Use your index finger or two fingers to push gauze to the wound bottom with each pass. The goal is filling the cavity completely with tightly packed material. It should take 3–5 yards of gauze for a significant wound.
- Apply hard, sustained pressure. Once packed, press down hard with both hands. Hold it. Don't let up. You need three full minutes of direct, firm pressure — by the clock, not by feel. Most people let up too early.
- Don't remove the gauze. If bleeding soaks through, add more gauze on top. Do not pull out the packed gauze — you'll disturb any clot forming at the source. Add, don't remove.
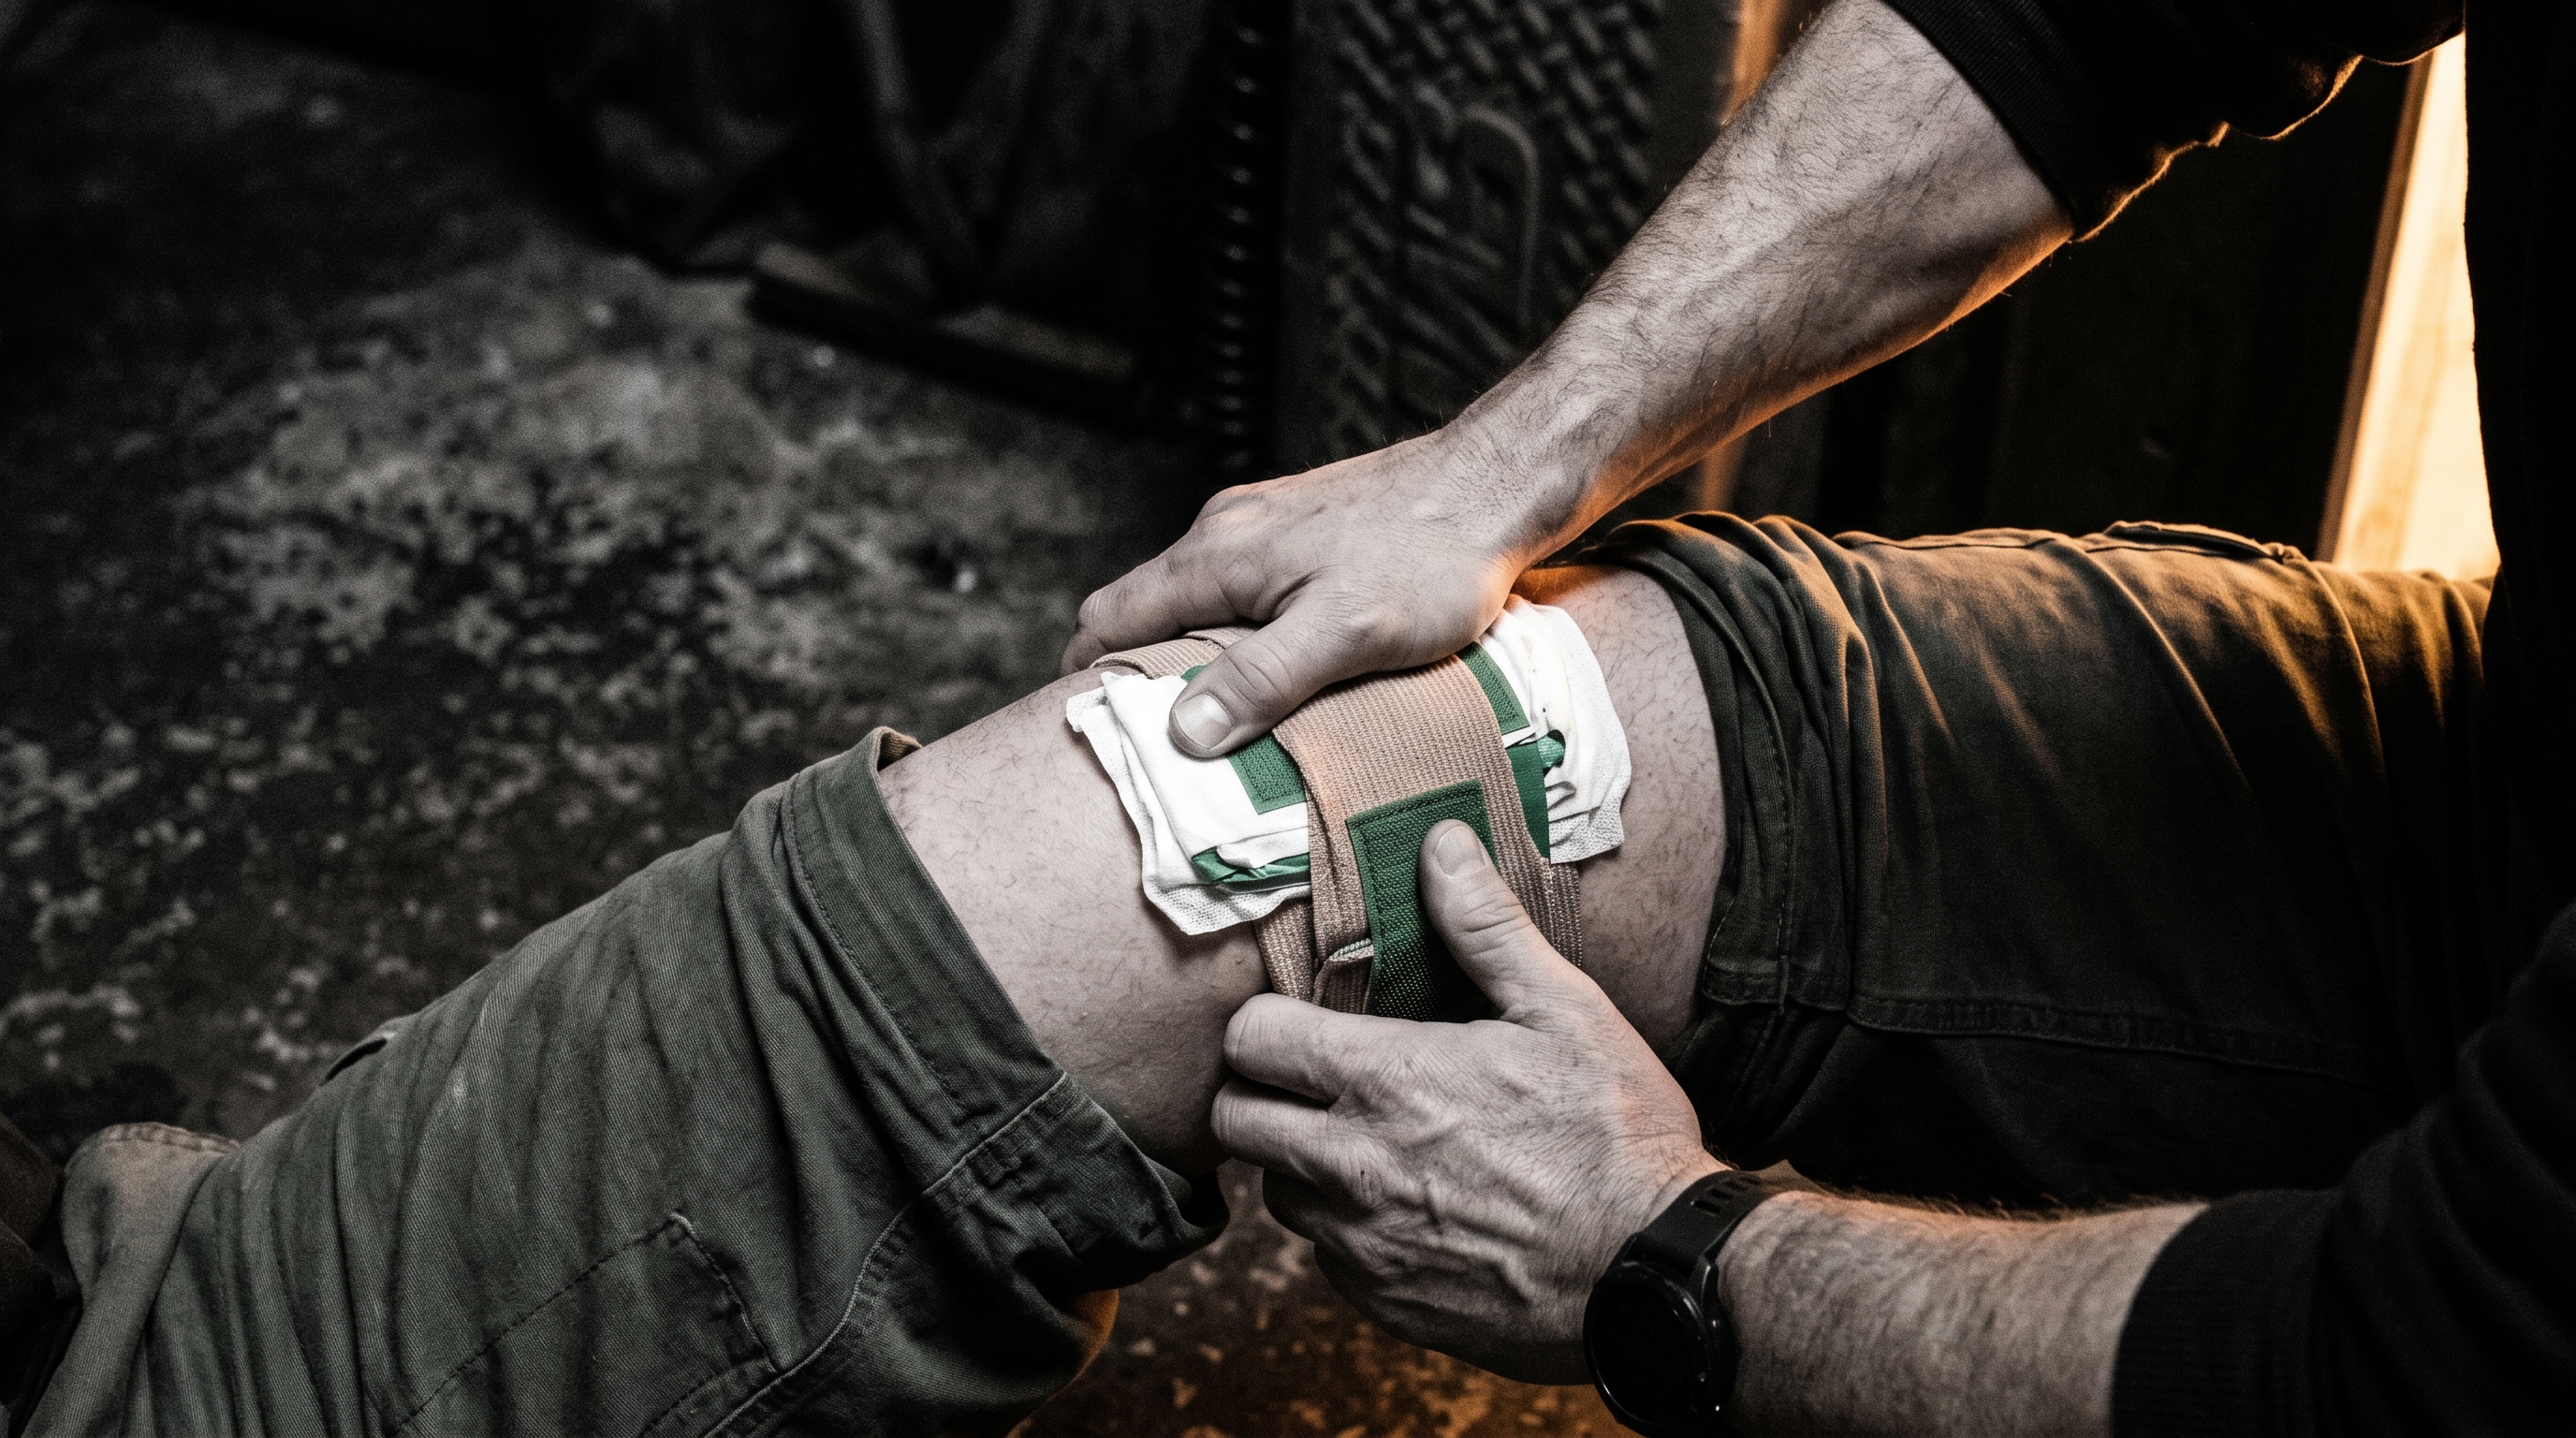
- Secure with a pressure bandage. Once three minutes of pressure are complete and bleeding has slowed or stopped, secure the packed wound with a trauma dressing or Israeli bandage. This maintains pressure while you address other injuries or wait for EMS.
- Call 911 and keep talking to the victim. If you haven't already, call emergency services. Keep the victim calm and awake. Shock sets in fast — watch for it.

Common Mistakes That Cost Lives
Most people who fail at wound packing make the same errors. Know them before you're in the situation.
Packing at the Surface Instead of the Depth
This is the single biggest mistake. Dropping gauze onto the wound opening feels like you're doing something — you're not. The bleeding source is deep. Get gauze to the bottom of the wound and pack up from there. If you only pack the top inch, you've created a loose plug that won't hold pressure at the source.
Not Packing Tightly Enough
Loosely placed gauze doesn't apply meaningful pressure. Pack it dense. Use your fingers to compress each layer before adding more. The wound should be completely full when you're done.
Letting Up on Pressure Too Early
Three minutes is longer than you think it is when someone is bleeding in front of you. Time it on your phone. Pressure is what keeps the gauze in contact with the bleeding vessel long enough for a clot to form. Let up at 90 seconds and you may undo everything.
Using Improvised Materials Without Packing Them Fully
A shirt can work in a true emergency. But fabric that isn't tightly woven doesn't apply pressure as efficiently as rolled gauze. If you're using improvised materials, pack even more aggressively and hold pressure longer.
Removing the Gauze Mid-Pressure
Don't check your work by pulling the gauze out. Add more on top if you're concerned. The only time gauze should come out is in a hospital setting with a surgeon nearby.
What to Do After Packing
Packing and pressure are the immediate interventions. Here's what comes next:
Watch for Shock
Significant blood loss triggers hemorrhagic shock. Watch for: pale, cool, or clammy skin; rapid or weak pulse; confusion or agitation; nausea; and sudden calmness (this is bad — it means the brain is shutting down non-essential functions). Keep the victim lying down, legs elevated if no spinal injury is suspected, and warm. Talk to them. Keep them conscious.
Don't Let Go Until EMS Arrives
Once you've packed and secured the wound, maintain pressure. If the trauma dressing holds, you can keep watch. If blood is soaking through, add more material and press. EMS will take over wound management when they arrive — don't hand off too early.
Document What You Used
If you used hemostatic gauze, tell the paramedics. QuikClot and Celox affect how the wound is managed at the hospital. Note the time you applied pressure and approximately how much gauze you used. This information matters in the ER.
Take Care of Yourself After
Responding to a traumatic injury leaves a mark. The adrenaline drops, the visual replays come. That's normal. Talk to someone. The fact that you acted — that you knew what to do — is the difference between a life saved and a life lost. That matters.
Knowing the technique is the first step. Having the right supplies when it counts is the next. 1st Hour builds civilian trauma kits with hemostatic gauze, pressure bandages, and everything else you need to act — not just watch. Because when something goes wrong, the first hour is the one that matters.
Build Your Wound Packing Kit Now
A wound packing kit doesn't need to be complicated. It needs to be complete and within reach. At minimum:
- Hemostatic gauze (QuikClot Combat Gauze or Celox) — at least one roll per kit
- Rolled plain gauze (backup)
- Trauma pressure bandage (Israeli bandage)
- Nitrile gloves (at least two pairs)
- Trauma shears (to cut through clothing fast)
- A tourniquet — because not every injury is junctional (see our tourniquet guide)
Keep one in your car. One in the house. If you carry a bag, one in it. The kit doesn't help if it's in the wrong place.
And practice. Pick up your gauze and pack a pillow, your arm, anything. The technique should be automatic — not something you're reading about for the first time while someone is bleeding.
Medical Disclaimer: The information in this article is for educational purposes only and is not a substitute for professional medical training or advice. Wound packing and hemorrhage control carry risks if performed incorrectly. Seek in-person training from a certified Stop the Bleed instructor or equivalent program. In any medical emergency, call 911 immediately. 1st Hour does not assume liability for outcomes resulting from the application of information presented here.


